

How To Create Pdf In Windows 10
Excel for Microsoft 365 Give-and-take for Microsoft 365 Access for Microsoft 365 Project Online Desktop Client Publisher for Microsoft 365 Discussion for the web OneNote for the web PowerPoint for the web Excel 2021 Give-and-take 2021 Access 2021 Project Professional 2021 Projection Standard 2021 Publisher 2021 OneNote 2021 Excel 2019 Discussion 2019 Access 2019 Project Professional 2019 Projection Standard 2019 Publisher 2019 Excel 2016 Word 2016 Access 2016 OneNote 2016 Project Professional 2016 Project Standard 2016 Publisher 2016 Office 2016 for Mac Excel 2013 Word 2013 Access 2013 OneNote 2013 Projection Professional person 2013 Project Standard 2013 Publisher 2013 Project Online Excel 2010 Word 2010 Access 2010 OneNote 2010 Project 2010 Projection Standard 2010 Publisher 2010 Office 2010 Excel Starter 2010 More...Less
You can utilize the Function programs to save or catechumen your files to PDFs so that you can share them or impress them using commercial printers. And you won't need any other software or add-ins.
Use PDF format when you want a file that:
-
Looks the same on nigh computers.
-
Has a smaller file size.
-
Complies with an manufacture format.
Examples include resumes, legal documents, newsletters, files that are intended to exist read (not edited) and printed, and files that are intended for professional printing.
Important:Many programs, including Microsoft Word, have the ability to open and edit PDF files. Only sharing something as a PDF is non sufficient to guarantee the recipient can't edit the file.
To come across step-by-step instructions, select an Part program from the drop-down list.
-
Open the table or written report you want to publish as a PDF.
-
On the External Data tab, in the Export grouping, select PDF or XPS.

-
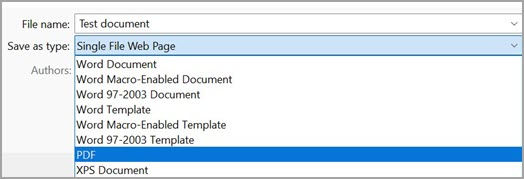
In the File Proper noun field, blazon or select a proper noun for the certificate.
-
In the Relieve as type list, select PDF (*.pdf) .
-
If the document requires high print quality, select Standard (publishing online and printing) .
-
If file size is more of import than impress quality, select Minimum size (publishing online).
-
-
Select Options to prepare the folio to be printed, to choose whether markup should be printed, and to select output options. Select OK .
-
Select Publish.
This information also applies to Microsoft Excel Starter 2010 .
Notation:Yous tin can't salvage Power View sheets as PDF files.
-
Select the File tab.
-
Select Salve As .
To see the Salve As dialog box in Excel 2013 or Excel 2016 , y'all take to choose a location and folder. -
In the File Proper noun box, enter a proper noun for the file, if you haven't already.
-
In the Save equally type list, select PDF (*.pdf) .
-
If you want the file to open up in the selected format subsequently saving, select the Open file after publishing check box .
-
If the document requires high impress quality, select Standard (publishing online and printing) .
-
If file size is more than important than print quality, select Minimum size (publishing online) .
-
-
Select Options to set the page to be printed, to choose whether markup should be printed, and to select output options. For more than information on the Options dialog box in Excel, see More about PDF options . Select OK when finished.
-
Select Save .
-
Select the File tab.
-
Select Export .
-
Nether Export Current , select what office of the notebook y'all desire to salvage as PDF.
-
Under Select Format , select PDF (*.pdf) , and and then select Consign .
-
In the Relieve As dialog box, in the File Proper name field, enter a proper noun for the notebook.
-
Select Save .
-
Select the File tab.
-
Select Save As .
To see the Save As dialog box in PowerPoint 2013 and PowerPoint 2016 , you have to choose a location and folder. -
In the File Proper name box, enter a proper noun for the file, if y'all haven't already.
-
In the Save as type list, select PDF (*.pdf) .
-
If y'all want the file to open in the selected format afterwards saving, select the Open file after publishing cheque box.
-
If the document requires high print quality, select Standard (publishing online and press) .
-
If the file size is more important than impress quality, select Minimum size (publishing online) .
-
-
Select Options to ready the folio to be printed, to choose whether markup should exist printed, and to select output options. Select OK when finished.
-
Select Relieve .
-
On the File tab, choose Save As .
To encounter the Relieve Every bit dialog box in Projection 2013 or Project 2016 , you have to choose a location and binder. -
In the File Proper noun box, enter a name for the file, if you oasis't already.
-
In the Save every bit blazon list, select PDF Files (*.pdf) or XPS Files (*.xps) , and then cull Salvage .
-
In the Document Export Options dialog box, select a Publish Range , whether to Include Non-printing Information , and ISO 19500-1 compliance (PDF merely).
Formatting tips
Project doesn't back up every PDF or XPS formatting characteristic, but you tin can still apply some print options to change the look of the final doc.
Choose File > Print , and then modify any of these options:
-
Dates
-
Orientation
-
Paper Size
-
Folio Setup
In the Page Setup dialog box, you tin can change options on these tabs:
-
Margins
-
Fable
-
View
-
Select the File tab.
-
Select Save As .
To meet the Salve As dialog box in Publisher 2013 or Publisher 2016, y'all take to choose a location and folder. -
In the File Name box, enter a proper noun for the file, if you haven't already.
-
In the Salvage as type list, select PDF (*.pdf) .
-
If you want to change how the document is optimized, select Change . (Select Options in Publisher 2013 or Publisher 2016.)
-
Make whatsoever changes you want to the picture resolution and non-printing information.
-
Select Impress Options to brand changes to the printing options for the document.
-
Select OK when finished.
-
-
If you lot want the file to open in the selected format after saving, select the Open file after publishing bank check box.
-
Select Save .
-
Select the File tab.
-
Select Salvage As .
To meet the Save As dialog box in Visio 2013 or Visio 2016, you have to choose a location and binder. -
In the File Name box, enter a name for the file, if you haven't already.
-
In the Salvage as type list, select PDF (*.pdf) .
-
If you desire the file to open in the selected format later on saving, select the Automatically view file after saving check box.
-
If the certificate requires high print quality, select Standard (publishing online and press) .
-
If file size is more of import than print quality, select Minimum size (publishing online) .
-
-
Select Options to set the page to exist printed, to cull whether markup should exist printed, and to select output options. Select OK .
-
Select Save .
-
If the file was previously saved, select File > Save a Re-create.
If the file is unsaved, select File > Save As. -
Select Scan to choose the location on your computer where you want to save the file.
-
In the driblet-downwardly listing, select PDF.
-
Select Salve.
Select More Options > Options to customize your PDF.
-
To brand a PDF file from merely some of the pages in your document, choose an pick under Page range.
-
To include tracked changes in the PDF, under Publish what, select Document showing markup. Otherwise, make sure Document is selected.
-
To create a ready of bookmarks in the PDF file, select Create bookmarks using. And then, choose Headings or, if y'all added bookmarks to your document, Word Bookmarks.
-
If you want to include certificate properties in the PDF, make certain Certificate backdrop is selected.
-
To brand the document easier for screen-reading software to read, select Document construction tags for accessibility.
-
ISO 19005-one compliant (PDF/A) This option outputs the PDF document as version 1.7 PDF, which is an archiving standard. PDF/A helps to insure that a document will wait the same when it's opened after on a different figurer.
-
Bitmap text when fonts may not be embedded If fonts can't exist embedded into the document, the PDF uses bitmap images of the text so that the PDF looks the same every bit the original certificate. If this choice isn't selected and the file uses a font that tin't exist embedded, then the PDF reader might substitute some other font.
-
Encrypt the document with a countersign To restrict access so only people with the password tin open up the PDF, select this pick. When you select OK, Word opens the Encrypt PDF Document box, where you lot can type and re-enter a password.
Open and re-create content from a PDF with Give-and-take
You can copy any content y'all want from a PDF by opening information technology in Word.
Become to File > Open and browse to the PDF file. Word opens the PDF content in a new file. Y'all tin re-create any content y'all desire from it, including images and diagrams.
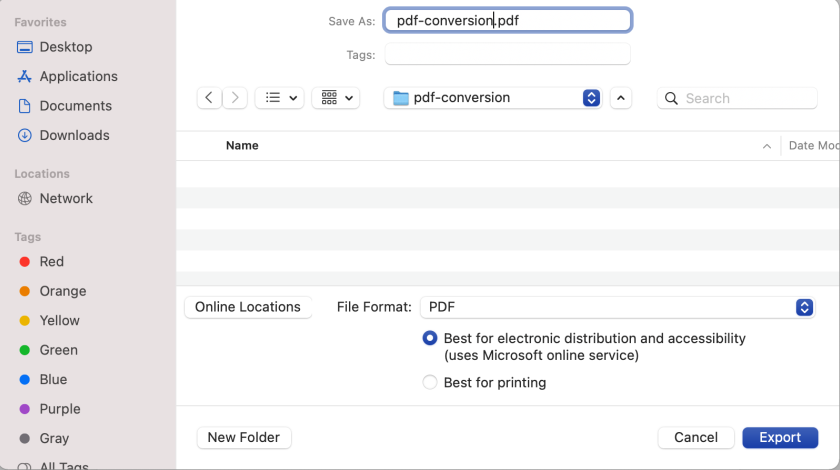
To relieve your file equally a PDF in Role for Mac follow these easy steps:
-
Select File.
-
Choose Relieve As.
-
Select File Format at the bottom of the window.
-
Choose PDF from the list of available file formats.
-
Give your file a proper noun, if information technology doesn't already have one, then select Export.
Note:When using Best for printing , the hyperlinks may not convert correctly. This is a known issue in Word for Mac.
You can use Give-and-take, PowerPoint, and OneNote for the Web to convert your doc into a PDF.
-
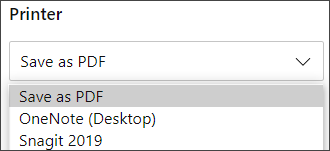
Select File > Print > Impress (in PowerPoint you will select ane of three formats).
-
In the dropdown menu nether Printer , select Salve as PDF and and then select Salvage.
-
Then in the Explorer card that opens you lot can name the PDF and choose where to relieve it and then select Salve.
This will generate a basic PDF that preserves the layout and format of your original document.
If you need more control over the options for your PDF, such as adding bookmarks, utilize the desktop app to convert your doc to a PDF. Select Open up in Desktop App in the toolbar of PowerPoint and OneNote to first using the desktop app, and in Discussion select the Editing dropdown first and then select Open in Desktop App .

If you don't own the desktop app, you can try or purchase the latest version of Part now.
Got a suggestion for this characteristic?
Vote for an idea, or share a new one in our proposition box at word.uservoice.com.
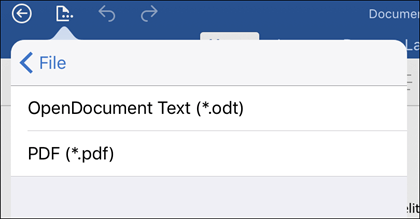
To export your Word document or Excel workbook to PDF format on iOS tap the File button at the height left, choose Consign and then PDF.
Portable Certificate Format (PDF) preserves document formatting and enables file sharing. When the PDF format file is viewed online or printed, it retains the format that you intended. The PDF format is besides useful for documents that will exist reproduced using commercial printing methods. PDF is accepted every bit a valid format past many agencies and organizations, and viewers are available on a wider variety of platforms than XPS.
XML Paper Specification (XPS) is an electronic file format that preserves document formatting and enables file sharing. The XPS format ensures that when the file is viewed online or printed, it retains exactly the format that you intended, and that information in the file cannot be easily changed.
Important:Well-nigh modern web browsers can open and display a PDF file. If you lot have an older operating system, however, y'all may demand a PDF reader installed on your device such as the Acrobat Reader, available from Adobe Systems.
Come across besides
-
Edit or make changes to a PDF file
-
Create accessible PDFs
Source: https://support.microsoft.com/en-us/office/save-or-convert-to-pdf-or-xps-in-office-desktop-apps-d85416c5-7d77-4fd6-a216-6f4bf7c7c110
Posted by: wilkersonnotemed.blogspot.com
0 Response to "How To Create Pdf In Windows 10"
Post a Comment